Ultimate Python installation on a Raspberry Pi & Ubuntu Script
The installation solution for any Python version on your Raspberry Pi or Ubuntu environment. You can install any Python version with one line of code.
Python! I really love Python! As well as I love Raspberry Pi’s! I’ve got multiple Raspberry Pi’s for all kind of appliances. But most of all I use them for Python script!
Installing Python, newer version of Python can be a hassle! But! I’m here to help!
I’ve created a single line script for you to install Python the easy way on a Raspberry Pi and on Ubuntu!
So… It’s a very easy line of code! You only have to fill in what version of Python you want. 3.9.0 or 3.8.0 or 3.9.0, 3.9.7, 3.10.0 you can find the complete list here.
Notices!
Some things to know before you use my script!
1. There is no warranty that this works and no warranty if it breaks stuff;
2. It updates the OS of your raspberry pi or Ubuntu on your machine;
3. Please consider to donate, as I have really put some time into building this!
The all in one Python Installer for Raspberry Pi!
So open a terminal and connect to your raspberry pi (or open a terminal on Ubuntu if you want to install it on Ubuntu) and simply run this installer by :
wget -qO - https://raw.githubusercontent.com/tvdsluijs/sh-python-installer/main/python.sh | sudo bash -s [python_verion]
Fill in the Python version you want at the end where it states _[python_verion] (remove the brackets)_
So, if you want to install version 3.9.7 do:
wget -qO - https://raw.githubusercontent.com/tvdsluijs/sh-python-installer/main/python.sh | sudo bash -s 3.9.7
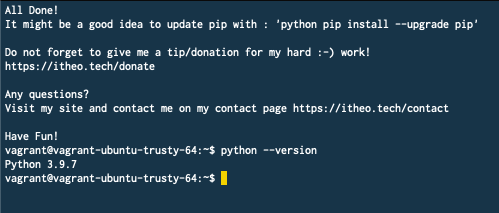
When this script has run correctly you will see:

How does this Python Raspberry Pi installation script work
It works out of a SH file.
sh is a command language interpreter that executes commands read from a command line string, the standard input, or a specified file.
The Bourne shell was developed in 1977 by Stephen Bourne at AT&T’s Bell Labs in 1977. It was the default shell of Unix Version 7. And sh also works great on Raspberry OS, Ubuntu and other linux based systems.
So my sh file is a big mix of command lines. These lines are usually put in by you manually, line for line to install Python on your Raspberry Pi. All that manual work is now done by one file.
The sh file is situated on the servers of GitHub. With the command WGET you are downloading the sh file from the GitHub servers. With the Pipe | Sudo Bash you essentially say, what you downloaded please run as Admin.
Then with the -s 3.9.7 you say as an argument to the SH script I like to feed python version 3.9.7 to the script.
The file picks up the argument and starts downloading and installing all the things it needs to install the given python version on to your Raspberry Pi or your Ubuntu environment.
Python Raspberry PI installation Script
The script that installs Python on to your Raspberry pi is actually quite simple to read. You can go to my GitHub account to look at it.
I’ll explain some of the code here.
In the first few lines after _install_python () {_ you will find these 2 lines of code
    new_version="$1"
        py_main_version=${new_version::-2}
Where the first line of code get’s the argument you have given it and puts it in a variable. So like 3.9.7 and the second line strips away the last two characters and puts it in a variable.. So 3.9.7 will become 3.9
Those two variables will be used throughout the script for creating file names, downloading the right python version checking if the right version is installed e.g.
With this piece of code I will check if you are not trying to install a python version lower then your current version.
if [ "$(printf '%s\n' "$new_version" "$old_version" | sort -V | head -n1)" = "$new_version" ]; then
After that check the script updates your OS, installs some system essential software and installs python related essential software with
    apt -qq update < /dev/null
    apt -qq install wget build-essential checkinstall < /dev/null
    apt -qq install build-essential zlib1g-dev libncurses5-dev libgdbm-dev libnss3-dev libssl-dev libreadline-dev libffi-dev libsqlite3-dev wget libbz2-dev < /dev/null
As you can see I put < /dev/null behind each line. It suppresses all output on installing, -qq does the same but it also agrees on any installment questions. So I’m trying to keep as clean as possible on your screen. Later on that does not work anymore, but well, it works.
Next, downloading your new python version, unpacking it and installing it with
    wget ${url}
    tar -Jxf ${file} < /dev/null
    ./configure --enable-optimizations --prefix=/usr < /dev/null
    make < /dev/nul
    sudo make altinstall < /dev/null
Now this little part –prefix=/usr is important. It actually installs Python in the same folder as all the other python versions. If you do not use the prefix part it will install it in an other folder and you will have a problem when setting the new version to your default version.
As for setting the newly installed version as default, use
update-alternatives --install /usr/bin/python python /usr/bin/python${py_main_version} 1
And that is about it! And these are not all the lines you have to put in manually… there are more. But with my simple one line Python for Raspbarry Pi script it easy peasy!
Have Fun! Let me know if you have any questions! And please do not forget to donate!


