


Free script and Guide to have your own automated DDNS for changing ip addresses and your own Domain name and a free Cloud Flare account.
DDNS or Dynamic DNS keeps your DNS (Domain Name Server) records automatically up to date when an IP address changes.
Dynamic DNS is mostly used in large networks that host internal services, having their own internal DNS and DHCP servers.
However small companies, and home networks who don’t normally have their own DNS server could use DDNS then they have the outside IP address changing a lot when they have a domain name connected to that IP address.
Dynamic DNS (DDNS) is a method of automatically updating a name server in the Domain Name System. Instead of having to manually make changes in a DNS for your domain name and changed IP address, a third-party service will track those changes for you.
Those services are mostly free, however you are not allowed to use your own domain. If you want to use your own domain you will have to pay or use my solution with Python and a free CloudFlare account.
CloudFlare Setup for your Python DDNS
First thing you have to do is create a free cloudflare account and connect your domain to it. If you already have a free account you can use the same.
Add your domain you want to use to Cloudflare.
In the DNS settings already setup your domain or subdomain with your current IP address.
In the overview tab you can vind Zone ID on the right side of the screen, Copy the Zone ID.

You need this Zone ID later.
Next click on the Get your API token.
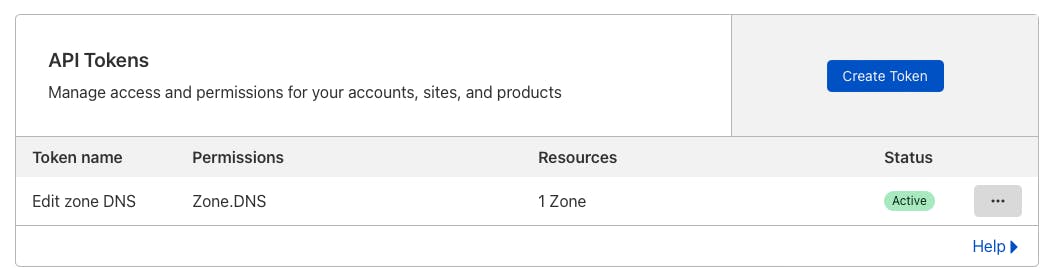 DDNS CloudFlare Python free solution
Click the Create Token and set it up to Edit DNS!
Copy the API key, you will need it later.
Python DDNS script
This script is to set your home (or business) IP address via cloudflare dns on A-record domain record.
Specially used when you do not have a fixed IP address.
This script checks your current IP address by using the Amazon service checkip.amazonaws.com. The service checkip.amazonaws.com provides the public IP address of the client making the request. Please be sure that your device running this script is not behind a VPN.
Installation
do a git clone
git clone git@github.com:tvdsluijs/python_ddns.git
Go into the folder that was created
cd python_ddns
Create an environment when needed within the folder
macOS/Linux
You may need to run sudo apt-get install python3-venv first
python3 -m venv .venv
Windows
You can also use py -3 -m venv .venv
python -m venv .venv
Then install the needed requirements with
pip install -r requirements.txt
Create a config.ini from the config_sample.ini.
NOTICE: KEEP your zone_id and API-Key to yourself!!!! Do not share with anyone!!!
With the following information
- zone_id =
- api_token =
- ip_address_type = A
- dns_name =
zone_id you have copied this in a earlier step.
api_token you have copied this also in an earlier step.
I'm guessing you only need the A ip address type so you keep ip_address_type to A
dns_name is the domain (or sub domain) you want to connect to your own IP address. home.example.com or example.com eg.
Usage
python ddns.py
That's all folks!
The script will run and keeps running untill you kill it.
Docker environment
Wait wait wait that is not all! I also created a docker environment for you to use. Docker images are easier to keep runing on a device like a Raspberry Pi.
Notice! Before building and running the Dockerfile please create your own config.ini file with the right information!!!
You can als run a docker instance with this script (as you like running Dockers)
This docker is running the Alpine Python framework. It's smaller than 80Mb, so lightweight (the normal python mage is 980mb)! Great to run on a Raspberry Pi.
To create the Docker environment (I assume you already have docker running) do:
docker build -t auto_ddns .
The docker build command builds Docker images from a Dockerfile and a “context”. A build’s context is the set of files located in the specified PATH or URL. The build process can refer to any of the files in the context. For example, your build can use a COPY instruction to reference a file in the context.
To run the docker (on the background) do:
docker run -d auto_ddns
That's all folks! Don't forget to donate!!
You can find all the code in my Github repository!